BulletML for Unity
Documentation: How to use
1. Import the Unity package
Import the whole package in your Unity project.
The Demo/ folder contains a demo scene with some patterns. You can delete the whole folder from your project once you don’t need the examples anymore.
The other folders are mandatory.
2. Main script
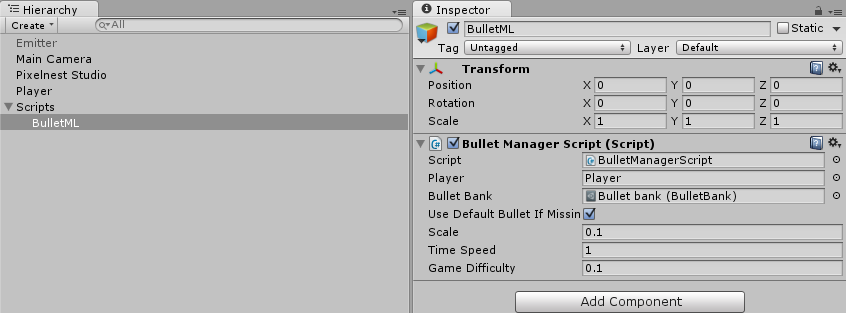
The heart of the plugin is contained in a BulletManagerScript.
You should add one occurrence of this script (and only one) to every scene that requires BulletML. The name and location don’t matter.
The script comes with some parameters:
-
Player— this is a direct reference to the “player”’s GameObject. Some patterns require the current location of the player to aim at it.Simply drag the
GameObjectcontaining your player’s location. You can always update it at runtime. -
Bullet Bank— this is the file that will decide how we will instantiate bullets for a pattern. It creates a link between a bullet name, a prefab and a sprite. Full explanation below with the “Bullet Bank” section. -
Use Default Bullet If Missing— if you don’t want to define each kind of bullet you use in your patterns, like we do in the demo (that would make dozens of identical bullets to define), simply check this.The first bullet in the bank will be used as the default one.
-
Scale— Between0fand1f. BulletML uses its own metric system.To be sure that a pattern fits in your game, you may need to tweak this
Scalevalue, especially if you imported an existing pattern file. -
TimeSpeed— Between0fand1f. You can speed or slow the whole engine with this parameter.
3. Bullet Bank
The plugin comes with a built-in mechanism to create bullets with the right sprites.
A bank is a file containing the associations between a bullet name, a GameObject prefab and a sprite.
Create a new bank
In your “Project” pane (the Assets folder), right click and choose: “Create” -> “BulletML” -> “Bullet Bank”.
Create a bullet container prefab
For your bullet prefab(s), you have the choice between two ways:
- One prefab for every bullet: the sprite will be affected by the
BulletBankobject at runtime. - One prefab for each bullet: the sprite is pre-affected by the prefab.
Tip: in fact, you can have both at the same time. For your standard enemies, you can use a prefab with a pre-affected sprite. However, for a boss, you can use the other way to have a common script for all its bullets AND different sprites, for example. It’s up to you to use the best option for your game.
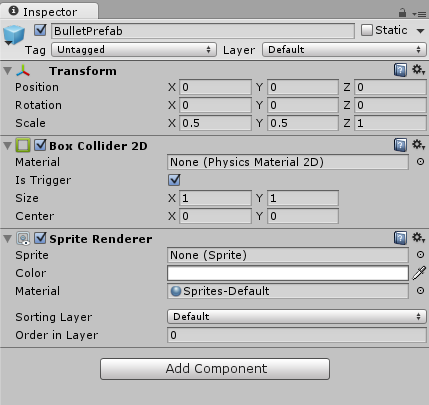
In either case, the prefab:
- Must have a
SpriteRenderer. - Can have a
BulletScript.
Here’s a simple prefab with a collider, as an example:
Fill the bank
When you have your prefabs and your bank, you can start to create the associations.
It’s time to define the bullets you will use in your game and your BulletML files.
Open your BulletBank:
You can define as many bullets as you want. A definition is:
-
Name— this is the name that you will use in your.xmlpattern file. -
Prefab— drag a bullet container that we have created above here. It will be instantiated automatically when requested by the pattern file. -
Sprite— (optional) the sprite image that will be set in theSpriteRendererof the bullet container prefab at runtime. -
Time To Live In Seconds— bullets are automatically destroyed after a duration time defined here. If your bullets are very fast, you should have a low time to live value.
Turn off: if you wish to turn off this feature and handle the destruction yourself, set the Time To Live value to 0. This is especially useful when integrating with another plugin that manages bullets spawn and de-spawn.
Destroy When Out Of Screen— if ticked, the bullets are automatically removed when they are not visible anymore. It is a simple way to avoid a too large number of bullets in the scene at a given time.
Destroying a bullet
As you have seen before, you can use the Time To Live In Seconds or Destroy When Out Of Screen properties of the bank to automatically clear the bullets.
Nevertheless, these two options may not suit your pattern logic. In this case, you can also use the standard BulletML command vanish manually in your pattern.
4. Bullet source
We’re nearly done! We have our bank and our bullets but they are still unused.
A “bullet source” is simply a projectile launcher: it will execute a pattern as defined in a BulletML pattern file.
Add a BulletSourceScript to a new object or to a sprite in your scene.
A BulletSourceScript has only one parameter:
Xml File— this is the BulletML file you want to use for this bullet source.
Make sure that your file is in your Assets folder and simply drag it in the field to assign it.
The XML file will be parsed on the script Start and any error will be reported in the console.
5. Example
Here’s a nice BulletML example:
<?xml version="1.0" ?>
<!DOCTYPE bulletml SYSTEM "bulletml.dtd">

<bulletml type="horizontal" xmlns="http://www.asahi-net.or.jp/~cs8k-cyu/bulletml">

  <action label="top">
    <repeat>
      <!-- The main loop, until the boss is destroyed -->
      <times>99999</times>
      <action>
        <fire>
          <direction type="absolute">360 * $rand</direction>
          <bulletRef label="boss3_shot"/>
        </fire>
        <wait>30 - (15 * $rank)</wait>
      </action>
    </repeat>
  </action>

  <bullet label="boss3_shot">
    <speed>0.25 + 0.25 * $rank</speed>
    <action>
      <wait>30 * (2.0 - 1.0 * $rank)</wait>
      <actionRef label="frag_shot">
        <param>0</param>
      </actionRef>
      <actionRef label="frag_shot">
        <param>90</param>
      </actionRef>
      <actionRef label="frag_shot">
        <param>180</param>
      </actionRef>
      <actionRef label="frag_shot">
        <param>270</param>
      </actionRef>

      <vanish />
    </action>
  </bullet>

  <action label="frag_shot">
    <fire>
      <direction type="relative">$1</direction>
      <speed>0.2 + $rank * 0.2</speed>
      <bulletRef label="boss3_shot_2"/>
    </fire>
  </action>

  <bullet label="boss3_shot_2">
    <action>
      <wait>20 * (2.0 - 1.0 * $rank)</wait>
      <fire>
        <direction type="relative">30</direction>
        <speed>0.4 + $rank * 0.3</speed>
        <bullet label="boss3_shot_3"/>
      </fire>
      <fire>
        <direction type="relative">-30</direction>
        <speed>0.4 + $rank * 0.3</speed>
        <bullet label="boss3_shot_3"/>
      </fire>
      <vanish />
    </action>
  </bullet>

</bulletml>
(Save it in your Assets folder)
If you haven’t done it already, put a BulletManagerScript in your scene. Then, create a BulletBank and a default bullet container prefab. Associate the prefab in the bank.
Then create a new object and assign the pattern that you have just saved to a newly added BulletSourceScript on this object.
If you start the game, you will see the pattern being played:
And this is all you need to know to use BulletML for Unity. In the next section, we will learn a bit more about creating a BulletML pattern file.


