Shooting (1/2)
Our player ship is facing a terrifying Poulpi, but cannot do anything…
Let’s grant him a weapon and some ammo! This will involve a bit more of scripting, but be confident. It’s worth it.
Projectile
First, before allowing the player to shoot, we need to define a game object that represents the projectiles he will use.
Here is the sprite:

(Right click to save the image)
The projectile is an object that we will use a lot: There is going to be a few instances on the screen when the player will be shooting.
What should we use in this case ? A Prefab of course!
Preparing the Prefab
You should be used to the procedure now:
- Import the image.
- Create a new
Spritein the scene. - Set the image on the sprite.
- Set the “Sprite Layer” to “Bullets”.
- Add a “Rigidbody 2D” with
0“Gravity Scale” and “Fixed Angles”. - Add a “Box Collider 2D”.
Set the scale to (0.5, 0.5, 1) so it will look good.
However, this time, we need to set a new parameter in the “Inspector”:
- In the “Box Collider 2D”, check the “Is Trigger” property.
A trigger collider raises an event when colliding but is not used by the physics simulation.
It means that a shot will pass through an object on touching — there won’t be any “real” interaction at all. Yet, the other collider is going to have its “OnTriggerEnter2D” event raised.
Tada, you have a shot! Time to script the behavior.
Create a new script called “ShotScript”:
using UnityEngine;

/// <summary>
/// Projectile behavior
/// </summary>
public class ShotScript : MonoBehaviour
{
  // 1 - Designer variables

  /// <summary>
  /// Damage inflicted
  /// </summary>
  public int damage = 1;

  /// <summary>
  /// Projectile damage player or enemies?
  /// </summary>
  public bool isEnemyShot = false;

  void Start()
  {
    // 2 - Limited time to live to avoid any leak
    Destroy(gameObject, 20); // 20sec
  }
}
- Some designer variables for the speed, direction and damages.
- We destroy the object after 20 seconds to avoid any leak.
Attach the “ShotScript” to the sprite. Add a “MoveScript” too so your shots will move.
Then drag the shot game object in the “Project” pane to create a Prefab from it. We will need it in a few steps.
You should have this configuration:
If you start the game with the “Play” button, you will see that the shot is moving.
Collisions and damages
However, the shot is not (yet) destroying anything.
Don’t be surprised, we didn’t script the damage behavior. We only need one new script, “HealthScript”:
using UnityEngine;

/// <summary>
/// Handle hitpoints and damages
/// </summary>
public class HealthScript : MonoBehaviour
{
  /// <summary>
  /// Total hitpoints
  /// </summary>
  public int hp = 1;

  /// <summary>
  /// Enemy or player?
  /// </summary>
  public bool isEnemy = true;

  /// <summary>
  /// Inflicts damage and check if the object should be destroyed
  /// </summary>
  /// <param name="damageCount"></param>
  public void Damage(int damageCount)
  {
    hp -= damageCount;

    if (hp <= 0)
    {
      // Dead!
      Destroy(gameObject);
    }
  }

  void OnTriggerEnter2D(Collider2D otherCollider)
  {
    // Is this a shot?
    ShotScript shot = otherCollider.gameObject.GetComponent<ShotScript>();
    if (shot != null)
    {
      // Avoid friendly fire
      if (shot.isEnemyShot != isEnemy)
      {
        Damage(shot.damage);

        // Destroy the shot
        Destroy(shot.gameObject); // Remember to always target the game object, otherwise you will just remove the script
      }
    }
  }
}
Attach this “HealthScript” on the Poulpi Prefab.
Attention: it’s better to work on the Prefab directly.
By doing so, every instantiated enemy in the scene is going to be modified to reflect the Prefab. It is particularly important here because we will have a lot of enemies in the scene.
If you have worked on a game object instance instead of the Prefab, don’t be scared: you can click on the “Apply” button at the top of the “Inspector” to add the changes to the Prefab.
Make sure the shot and the Poulpi are on the same line to test the collision.
Note: the 2D physics engine, Box2D, doesn’t use the Z position. Colliders 2D will always be in the same plane even if your game objects are not.
Now play the scene and observe:
If the enemy has more health than the shot damages, he will survive. Try to change the hp value in the enemy’s “HealthScript”:

Firing
Delete the shot in the scene. It has nothing to do there now that we have finished it.
We need a new script to fire shots. Create one called “WeaponScript”.
This script will be reused everywhere (players, enemies, etc.). Its purpose is to instantiate a projectile in front of the game object it is attached to.
Here’s the full code, bigger than usual. The explanations are below:
using UnityEngine;

/// <summary>
/// Launch projectile
/// </summary>
public class WeaponScript : MonoBehaviour
{
  //--------------------------------
  // 1 - Designer variables
  //--------------------------------

  /// <summary>
  /// Projectile prefab for shooting
  /// </summary>
  public Transform shotPrefab;

  /// <summary>
  /// Cooldown in seconds between two shots
  /// </summary>
  public float shootingRate = 0.25f;

  //--------------------------------
  // 2 - Cooldown
  //--------------------------------

  private float shootCooldown;

  void Start()
  {
    shootCooldown = 0f;
  }

  void Update()
  {
    if (shootCooldown > 0)
    {
      shootCooldown -= Time.deltaTime;
    }
  }

  //--------------------------------
  // 3 - Shooting from another script
  //--------------------------------

  /// <summary>
  /// Create a new projectile if possible
  /// </summary>
  public void Attack(bool isEnemy)
  {
    if (CanAttack)
    {
      shootCooldown = shootingRate;

      // Create a new shot
      var shotTransform = Instantiate(shotPrefab) as Transform;

      // Assign position
      shotTransform.position = transform.position;

      // The is enemy property
      ShotScript shot = shotTransform.gameObject.GetComponent<ShotScript>();
      if (shot != null)
      {
        shot.isEnemyShot = isEnemy;
      }

      // Make the weapon shot always towards it
      MoveScript move = shotTransform.gameObject.GetComponent<MoveScript>();
      if (move != null)
      {
        move.direction = this.transform.right; // towards in 2D space is the right of the sprite
      }
    }
  }

  /// <summary>
  /// Is the weapon ready to create a new projectile?
  /// </summary>
  public bool CanAttack
  {
    get
    {
      return shootCooldown <= 0f;
    }
  }
}
Attach this script to the player.
The script is divided in three parts:
1. Variables availables in the “Inspector” pane
We have two members here : shotPrefab and shootingRate.
The first one is needed to set the shot that will be used with this weapon.
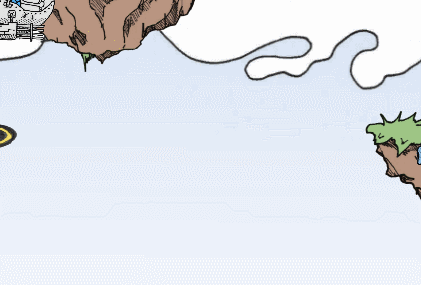
Select your player in the scene “Hierarchy”. In the “WeaponScript” component, you can see the property “Shot Prefab” with a “None” value.
Drag the “Shot” prefab in this field:
Unity will automatically fill the script with this information. Easy, right?
The shootingRate variable has a default value set in the code. We will not change it for the moment. But you can start the game and experiment with it to test what it does.
Be careful: changing a variable value in the Unity “Inspector” does not apply the change to the default value of the script. If you add the script onto another object, the default value will be the one from the script.
It’s logical, but you need to be careful. If you want to keep the tweaked value definitively, you have to open your code editor and backport the change yourself.
2. Cooldown
Guns have a firing rate. If not, you would be able to create tons of projectiles at each frame.
So we have a simple cooldown mechanism. If it is greater than 0 we simply cannot shoot. We substract the elapsed time at each frame.
3. Public attack method
This is the main purpose of this script: being called from another one. This is why we have a public method that can create the projectile.
Once the projectile is instantiated, we retrieve the scripts of the shot object and override some variables.
Note: the GetComponent<TypeOfComponent>() method allows you to get a precise component (and thus a script, because a script is a component after all) from an object. The generic (<TypeOfComponent>) is used to indicate the exact component that you want.
There is also a GetComponents<TypeOfComponent>() that gets an array instead of the first one, etc.
Using the weapon with the player entity
If you launch the game at this point, nothing has changed at all. We have created a weapon but it’s completely useless.
Indeed, even if a “WeaponScript” was attached to an entity, the Attack(bool) method would never be called.
Let’s go back to “PlayerScript”.
In the Update() method, put this snippet:
  void Update()
  {
    // ...

    // 5 - Shooting
    bool shoot = Input.GetButtonDown("Fire1");
    shoot |= Input.GetButtonDown("Fire2");
    // Careful: For Mac users, ctrl + arrow is a bad idea

    if (shoot)
    {
      WeaponScript weapon = GetComponent<WeaponScript>();
      if (weapon != null)
      {
        // false because the player is not an enemy
        weapon.Attack(false);
      }
    }

    // ...
  }
It doesn’t matter at this point if you put it after or before the movement.
What did we do ?
- We read the input from a fire button (
clickorctrlby default). - We retrieve the weapon’s script.
- We call
Attack(false).
Button down: you can notice that we use the GetButtonDown() method to get an input. The “Down” at the end allows us to get the input when the button has been pressed once and only once. GetButton() returns true at each frame until the button is released. In our case, we clearly want the behavior of the GetButtonDown() method.
Try to use GetButton() instead, and observe the difference.
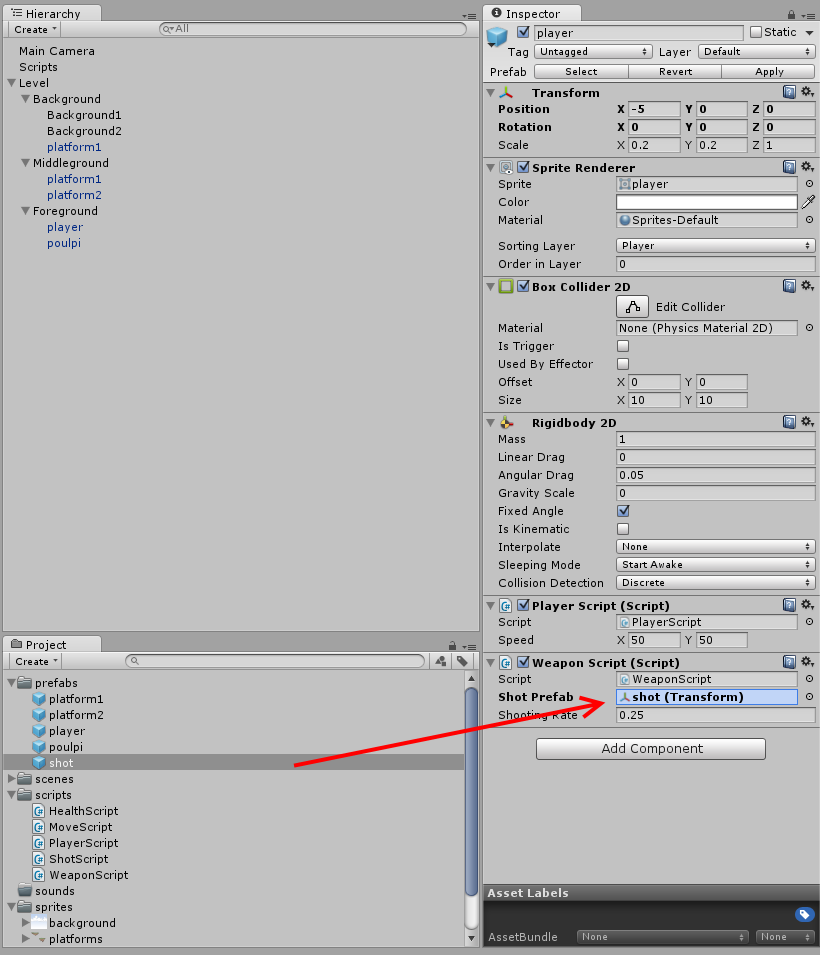
Launch the game with the “Play” button. You should get this:

The bullets are too slow? Experiment with the “Shot” prefab to find a configuration you’d like.
Bonus: Just for fun, add a rotation to the player, like (0, 0, 45).
The shots have a 45 degrees movement, even if the rotation of the shot sprite is not correct as we didn’t change it too.
Next step
We have a shooter! A very basic one, but a shooter despite everything. You learned how to create a weapon that can fire shots and destroy other objects.
Try to add more enemies. ;)
But this part is not over! We want enemies that can shoot too. Take a break, what comes next is mainly reusing what we did here.
