Playing with particles
Our shooter is starting to have a good shape. It’s time to enhance it a bit visually with particles.
Particles are (basically) simple sprites that will be repeated and displayed for a very short timespan.
Think about explosions, lasers, smokes, etc. Those are done with particles — most of the time (an explosion can be a simple animated sprite).
Unity provides a powerful built-in editor for particles with the Shuriken Engine. Let’s see what we can do with it.
Explosion prefab
We will make an explosion that is going to be used when an enemy or a player is destroyed. This involves to:
- Create a particle system of our explosion (as a prefab).
- Instantiate and play it when needed.
An explosion is usually made of two things: fire and smoke.
Smoke particles
Create a new “Particle System” (“Game Object” -> “Create Other” -> “Particle System”).
Tip: we recommend that you work on an empty part of the scene (or in an empty scene) so you can clearly see what is happening.
If you want to focus on an object in the “Scene” view, you can double-click on it in the “Hierarchy”, or press F inside the “Scene” view.
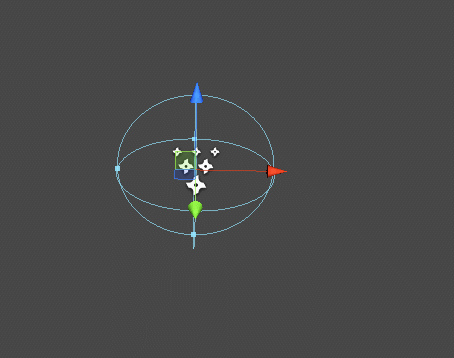
By zooming on your particle system, you will see a continuous flow of sparks emitted by the particles game object:
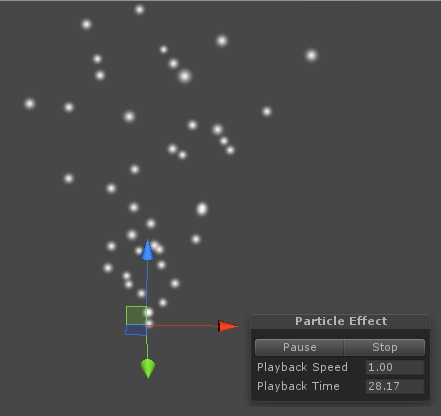
Observe the new window (with “Pause” and “Stop”) in the “Scene” view, or the “Inspector” pane. Yes, the latter is now filled with dozen of fields related to the particle system.
And that’s where all the fun lie!
Note: when you select a particle system in the “Hierarchy”, it starts simulating the system. If you unselect it, it stops. It’s really practical to see what the system does in real (and instantly) when you conceive it.
We will use this sprite for the smoke particles:

(Right click to save the image)
Tip: if you have an issue with the transparency when using your own asset, be sure that transparent pixels are black ones with 0 alpha. Indeed, even if a pixel is not visible, it still has a value. Which is used by the computer.
Copy the image in the “Textures” folder. Change the “Texture Type” to “Texture”, and set “Alpha Is Transparent”. You should have:

Note: we are using a Unity 3D feature, not a “2D one”. In fact, it doesn’t matter. When you use the “2D” tools, you are only using a subset of Unity. But the full power of Unity is still there, ready to be used.
Assign the texture to the particle:
- Drag the texture to your particle system in the “Inspector” (or onto the particles object in the “Hierarchy”, which will assign the texture to the right property inside the “Inspector”).
- Change the shader to “Particles” -> “Alpha Blended”:

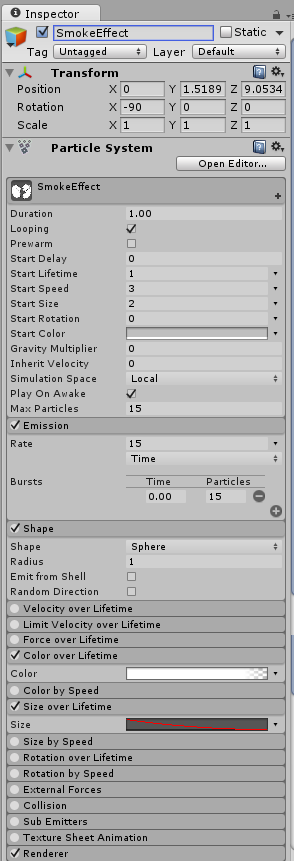
To create a perfect smoke particles, we have to change many settings in the particle system “Inspector”.
For the tutorial, we recommend to use:
| Category | Parameter name | Value |
|---|---|---|
| General | Duration | 1 |
| General | Max Particles | 15 |
| General | Start Lifetime | 1 |
| General | Start Color | Gray |
| General | Start Speed | 3 |
| General | Start Size | 2 |
| Emission | Bursts | 0 : 15 |
| Shape | Shape | Sphere |
| Color Over Lifetime | Color | See below (N°1) |
| Size Over Lifetime | Size | See below (N°2) |
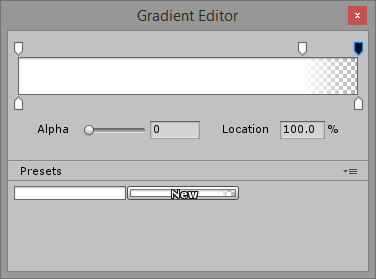
N°1 — Color Over lifetime
Set an alpha in the end to create a fade out:
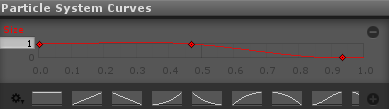
N°2 — Size Over lifetime
Choose a decreasing curve:
You should have:
Feel free to tweak the system. Play with the editor to see how it works. It’s your game after all. :)
When you are satisfied, uncheck “Looping”.
Observe the result:
It’s clearly not perfect, but notice how simple it was to create. Adding particles can make the difference between a dull game and one that is fun to watch.
Save as a prefab. You can organize a bit by creating a folder “Prefabs/Particles” and calling the prefab “SmokeEffect”.
Fire particles
This one is no different.
- Create a new particle system, just as you did above.
- Use the default material for fire (“Renderer/Material” to “Default-Particle”). It’s enough for our needs.
We recommend to use:
| Category | Parameter name | Value |
|---|---|---|
| General | Looping | false |
| General | Duration | 1 |
| General | Max Particles | 10 |
| General | Start Lifetime | 1 |
| General | Start Speed | 0.5 |
| General | Start Size | 2 |
| Emission | Bursts | 0 : 10 |
| Shape | Shape | Box |
| Color Over Lifetime | Color | See below (N°1) |
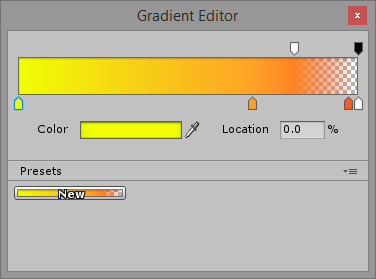
N°1 — Color Over Lifetime
Create a nice gradient from yellow to orange, with a fade out in the end:
And you should get:
Save as a “FireEffect” prefab.
Now, we are going to use these prefabs in a script.
Helper script
Instantiating those particles prefabs is identical to instantiating a player or a shot.
However, you must remember that they should get deleted when they are no longer needed.
Also, we will do a combination of a fire particle system and a smoke particle system in the script for our explosion.
Let’s create a “SpecialEffectsHelper” script:
using UnityEngine;

/// <summary>
/// Creating instance of particles from code with no effort
/// </summary>
public class SpecialEffectsHelper : MonoBehaviour
{
  /// <summary>
  /// Singleton
  /// </summary>
  public static SpecialEffectsHelper Instance;

  public ParticleSystem smokeEffect;
  public ParticleSystem fireEffect;

  void Awake()
  {
    // Register the singleton
    if (Instance != null)
    {
      Debug.LogError("Multiple instances of SpecialEffectsHelper!");
    }

    Instance = this;
  }

  /// <summary>
  /// Create an explosion at the given location
  /// </summary>
  /// <param name="position"></param>
  public void Explosion(Vector3 position)
  {
    // Smoke on the water
    instantiate(smokeEffect, position);

    // Tu tu tu, tu tu tudu

    // Fire in the sky
    instantiate(fireEffect, position);
  }

  /// <summary>
  /// Instantiate a Particle system from prefab
  /// </summary>
  /// <param name="prefab"></param>
  /// <returns></returns>
  private ParticleSystem instantiate(ParticleSystem prefab, Vector3 position)
  {
    ParticleSystem newParticleSystem = Instantiate(
      prefab,
      position,
      Quaternion.identity
    ) as ParticleSystem;

    // Make sure it will be destroyed
    Destroy(
      newParticleSystem.gameObject,
      newParticleSystem.startLifetime
    );

    return newParticleSystem;
  }
}
Note: because we can have multiple particles in the scene at the same time, we are forced to create a new prefab each time. If we were sure that only one system was used at a time, we would have kept the reference and use the same everytime.
We created a singleton that you can access from everywhere using the SpecialEffectsHelper.Instance member.
Singleton: a singleton is a design pattern that is used to guarantee that an object is only instantiated once. We have diverged a bit from the classic implementation in our script: the principle remains, however.
- Assign the script to the “Scripts” game object in the “Hierarchy”.
- Inspect it, and fill the fields with the correct prefabs.

Blow up that thing !
It’s (finally) time to call the script.
Open “HealthScript”. We will check when the game object is destroyed and, then, we will display our sweet explosion.
We just have to add one line:
SpecialEffectsHelper.Instance.Explosion(transform.position);
Into the Damage method of the “HealthScript”:
  public Damage(int damageCount)
  {
    // ...

    if (hp <= 0)
    {
      // 'Splosion!
      SpecialEffectsHelper.Instance.Explosion(transform.position);

      // Dead!
      Destroy(gameObject);
    }

    // ...
  }
Start the game. Try to shoot enemies. Then, let the player die.
(Click to see the result)
Not bad, right? Could be way better, though.
But hey, it’s up to you to make beautiful explosions using particles, now that you have an idea on how it works. ;)
Next Step
We have learned how to create particles using the built-in engine of Unity. And as you have seen, it’s that easy. Moreover, they add delight and feedbacks to your game.
Be careful however! It can slowly become time-consuming as you will probably prefer to tweak effects rather than code boring features like high-scores.
As James Silva wrote in Building XNA 2.0 games, you should work on particles at the end of the development or the other tasks will quickly loose interest.
Like using particles, there is another way to add feedbacks to your game: Sounds! And that’s just what we are going to learn in the next chapter.
